

Aluminum Fuel Door Modification By T. Guertin (Spocket)
STEP BY STEP ProcedureBy T. Guertin ('Spocket' on NECO) 11/19/2001
 Disclaimer
I do not have the credentials to offer automotive advice. The modification procedure that follows explain how I chose to approach a modification I wanted to make to my personal car. I am not suggesting that anyone else make this modification to his or her vehicle. In the event anyone chooses to accept the responsibility of initiating a similar vehicle modification, they should do so with the understanding it could result in undesired damage to their vehicle and could void the warrantee provided by the vehicle manufacturer. In addition, I wish to point out that undertaking any vehicle modification without proper knowledge, experience, tools, and safety equipment can result in personal injury.
Disclaimer
I do not have the credentials to offer automotive advice. The modification procedure that follows explain how I chose to approach a modification I wanted to make to my personal car. I am not suggesting that anyone else make this modification to his or her vehicle. In the event anyone chooses to accept the responsibility of initiating a similar vehicle modification, they should do so with the understanding it could result in undesired damage to their vehicle and could void the warrantee provided by the vehicle manufacturer. In addition, I wish to point out that undertaking any vehicle modification without proper knowledge, experience, tools, and safety equipment can result in personal injury.
Also, I don't claim to be the originator of this modification for the Mercury Cougar 99-02. I used directions from members of NECO (http://www.fastcougar.com/forums ) to perform my modification. This procedure is a combination of those indications, helpful pictures and my personal experience realizing the task. T. G.
Aluminum Fuel Door
The aluminum fuel door used for the installation is from the late model Mitsubishi Eclipse (00-01) optional equipment. This fuel door may be installed on the new-edge Cougar, with some modification.
Tools Required
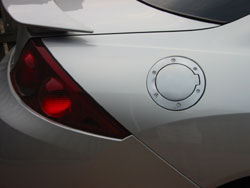
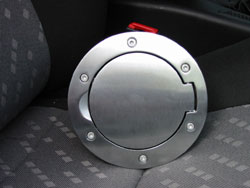
This step may be done prior to installation day. The Eclipse fuel door can be seen on pictures 1 and 2. It consists in a front plate with the door, with a plastic cup bolted to it.
A. Take the fuel door apart by loosing the screws and removing the plastic cup. The plastic cup will not be used on the cougar. We will modify the cougar one to fit the new fuel door.
B. The back surface of the fuel door has 'bumps' around each bolthole in order to match the Eclipse bodylines. Using the grinding tool, grind down each bump to obtain a continuous surface.
Work carefully to not damage the fuel door in the process. Take your time to do a good job.
Pict. 1 Pict. 2
2. Remove the Original Plastic Fuel Door from the Car
To remove the stock fuel door, simply open it and then pry it up and down till the hinge comes out with the spring.
3. Remove the Factory Plastic Cup
To do so, you will need to: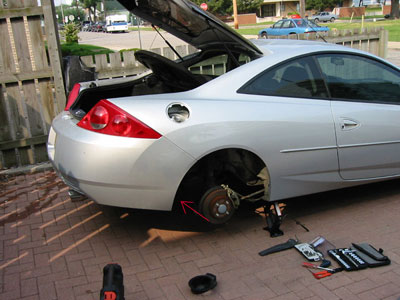
Pict. 3
4. Modify the Cougar Body to Accept the New Assembly
Use 'saran wrap' on the fuel tube inlet to prevent any ground material to slip inside the fuel tank (see picture 4).
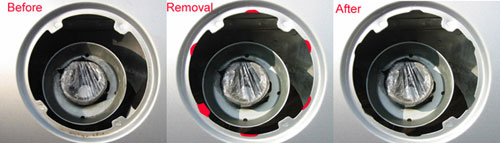
It's now time to do some grinding. Work carefully to not damage the body outside the fuel door area. Hold the grinding tool (Dremel) tool tight because it slips easily.
Picture 4 shows the material removal to make on the car body in order to install the fuel door. One tab (bottom left) must be completely ground off.
Also, put the new door on the hole and take note of each bolthole position. Grind a little bit around those areas to let the nuts of the new fuel door make their way at the final assembly.
Use primer and touch-up paint to cover the ground surfaces of the body to avoid future rust problems.
Be patient and work carefully, you'll never be able to tell once it is re-installed.
Pict. 4
5. Modify the Plastic Cup to Fit the New Door
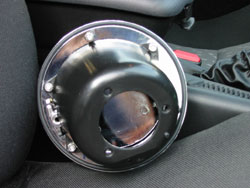
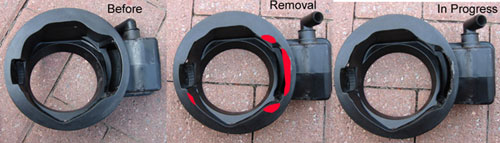
It is a trial and error process for this step. Grind areas of the Cougar plastic cup till the new fuel door sits flush on it. Picture 5 shows the cup before modification and later in the process. It shows also hints about the material removal to initially do. You might also have to do some work on the back of the cup to accept bolts and nuts.
Same as before: be patient and work carefully, you'll never be able to tell once everything is done.
Pict. 5
6. Mount the New Fuel Door to the Plastic Cup
The fuel door comes with Allen screws and nuts. It is very easy to mount:
7. Put Back Everything Together
Before putting all back together, make sure that the fuel door is sitting equally on the circumference of the plastic cup
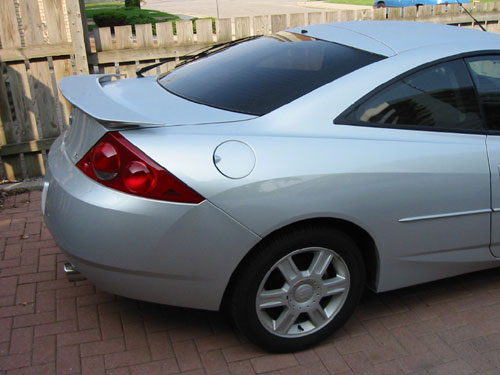
BEFORE:
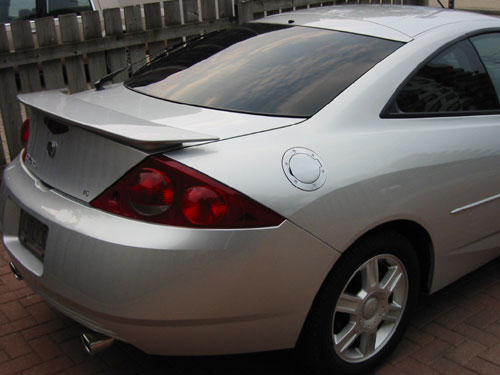
AFTER:
Contact Author
Thierry Guertin [ aka 'Spocket' on NECO ]
thierry.g@cogeco.ca
Additional Resources
New Edge Cougar Owner Group (NECO)
New Edge Cougar Owner Group (NECO) Forums
Disclaimer
I do not have the credentials to offer automotive advice. The modification procedure that follows explain how I chose to approach a modification I wanted to make to my personal car. I am not suggesting that anyone else make this modification to his or her vehicle. In the event anyone chooses to accept the responsibility of initiating a similar vehicle modification, they should do so with the understanding it could result in undesired damage to their vehicle and could void the warrantee provided by the vehicle manufacturer. In addition, I wish to point out that undertaking any vehicle modification without proper knowledge, experience, tools, and safety equipment can result in personal injury.
Also, I don't claim to be the originator of this modification for the Mercury Cougar 99-02. I used directions from members of NECO (http://www.fastcougar.com/forums ) to perform my modification. This procedure is a combination of those indications, helpful pictures and my personal experience realizing the task. T. G.
Aluminum Fuel Door
The aluminum fuel door used for the installation is from the late model Mitsubishi Eclipse (00-01) optional equipment. This fuel door may be installed on the new-edge Cougar, with some modification.
Tools Required
- Rotational tool (Dremel for instance) or some kind of manual buffer, with a heavy duty grinding bit.
- Screw Driver with 'Torx' heads
- Hex allen key (size matching the aluminum fuel door bolts)
- Box set (metric)
- Drill and drilling bits (size slightly bigger than the size of the bolts provided with the new door)
- Primer and touch-up paint to apply on the ground surfaces of the body
This step may be done prior to installation day. The Eclipse fuel door can be seen on pictures 1 and 2. It consists in a front plate with the door, with a plastic cup bolted to it.
A. Take the fuel door apart by loosing the screws and removing the plastic cup. The plastic cup will not be used on the cougar. We will modify the cougar one to fit the new fuel door.
B. The back surface of the fuel door has 'bumps' around each bolthole in order to match the Eclipse bodylines. Using the grinding tool, grind down each bump to obtain a continuous surface.
Work carefully to not damage the fuel door in the process. Take your time to do a good job.
Pict. 1 Pict. 2
2. Remove the Original Plastic Fuel Door from the Car
To remove the stock fuel door, simply open it and then pry it up and down till the hinge comes out with the spring.
3. Remove the Factory Plastic Cup
To do so, you will need to:
- Lift the rear passenger corner of the car and secure it; Then remove the wheel
- Remove the wheel well lining (held by few screws and tabs)
- To help you take out the plastic cup, you might loose the fuel line bracket located under the car (see arrow on picture 3)
- The plastic cup is held in by 4 tabs around the lip. You'll have to feel around from behind and push in. Once you get it loose, you have to pull really hard to get the cup out. See picture 5 to see the shape of the plastic cup. That will give you a hint about how you have to pull it. Don't worry; it will be much easier to put back in.
- There is also a rubber hose connected to the cup that you'll have to work loose.
Pict. 3
4. Modify the Cougar Body to Accept the New Assembly
Use 'saran wrap' on the fuel tube inlet to prevent any ground material to slip inside the fuel tank (see picture 4).
It's now time to do some grinding. Work carefully to not damage the body outside the fuel door area. Hold the grinding tool (Dremel) tool tight because it slips easily.
Picture 4 shows the material removal to make on the car body in order to install the fuel door. One tab (bottom left) must be completely ground off.
Also, put the new door on the hole and take note of each bolthole position. Grind a little bit around those areas to let the nuts of the new fuel door make their way at the final assembly.
Use primer and touch-up paint to cover the ground surfaces of the body to avoid future rust problems.
Be patient and work carefully, you'll never be able to tell once it is re-installed.
Pict. 4
5. Modify the Plastic Cup to Fit the New Door
It is a trial and error process for this step. Grind areas of the Cougar plastic cup till the new fuel door sits flush on it. Picture 5 shows the cup before modification and later in the process. It shows also hints about the material removal to initially do. You might also have to do some work on the back of the cup to accept bolts and nuts.
Same as before: be patient and work carefully, you'll never be able to tell once everything is done.
Pict. 5
6. Mount the New Fuel Door to the Plastic Cup
The fuel door comes with Allen screws and nuts. It is very easy to mount:
- Line the door up to the cup
- Mark the holes
- Drill them out on the cup. Make the holes a tad larger than the screws to allow for adjustment.
7. Put Back Everything Together
Before putting all back together, make sure that the fuel door is sitting equally on the circumference of the plastic cup
- Connect the hose to the plastic cup (from step 3E)
- Push the cup and door assembly back in place
- Don't forget to tight the fuel line bracket bolt (from step 3C)
- Put the wheel well on and the wheel
BEFORE:
AFTER:
Contact Author
Thierry Guertin [ aka 'Spocket' on NECO ]
thierry.g@cogeco.ca
Additional Resources
New Edge Cougar Owner Group (NECO)
New Edge Cougar Owner Group (NECO) Forums